Overview
Before we start with the tutorial let's get a brief overview over the architecture, the software used and how all components work together.
Who Does What?
- Posfix accepts e-mails from your users and other mail servers
- Rspamd filters SPAM and signs e-mails with DKIM
- Dovecot provides IMAP which your users can use to read e-mails
- Nextcloud offers contact/calendar sync, file sharing and Webmail
- PostgreSQL stores the user database and mail server configuration
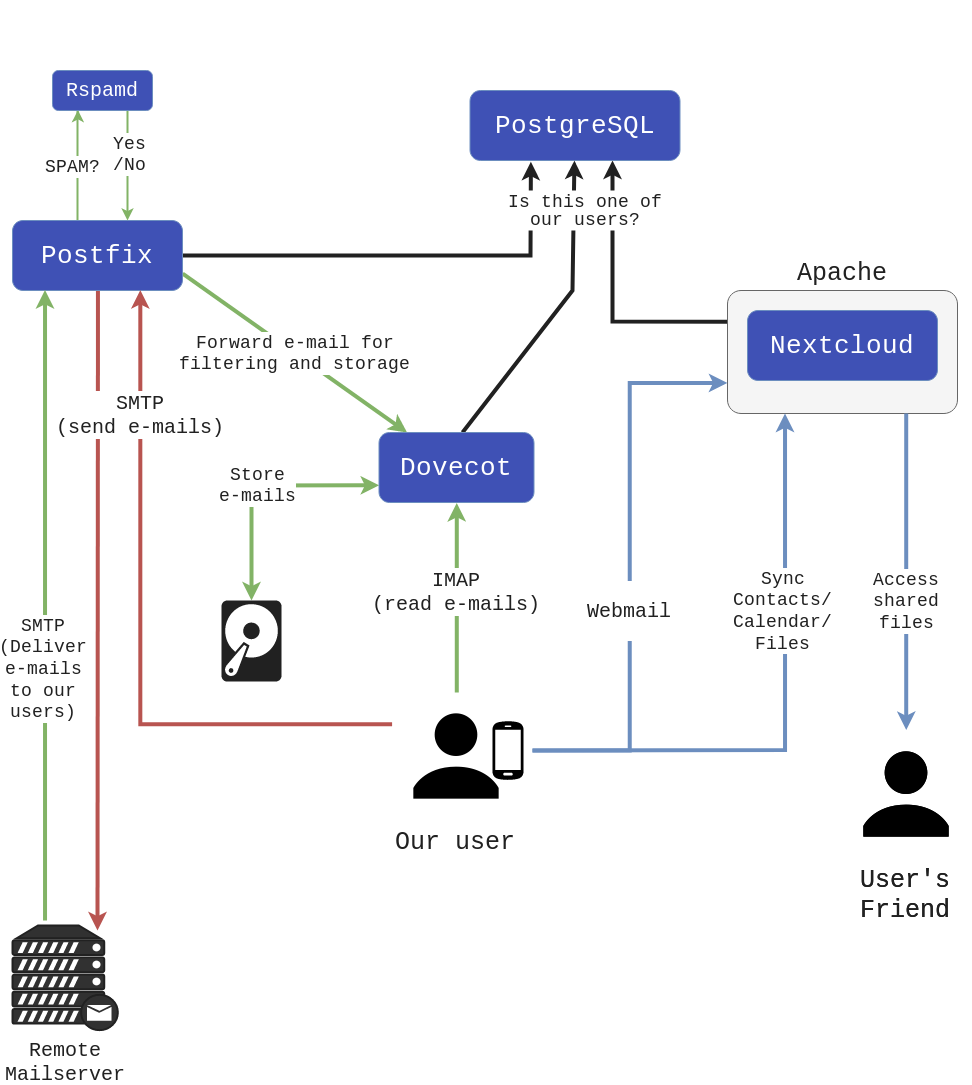
Architecture
The following diagram shows a simplified view of the architecture. Dark blue elements are the core software components. The green path illustrates receiving e-mails. The red path shows the sending of e-mails. The blue paths are related to webmail, contact and calendar sync and file sharing using Nextcloud.
Receiving E-Mails in Detail
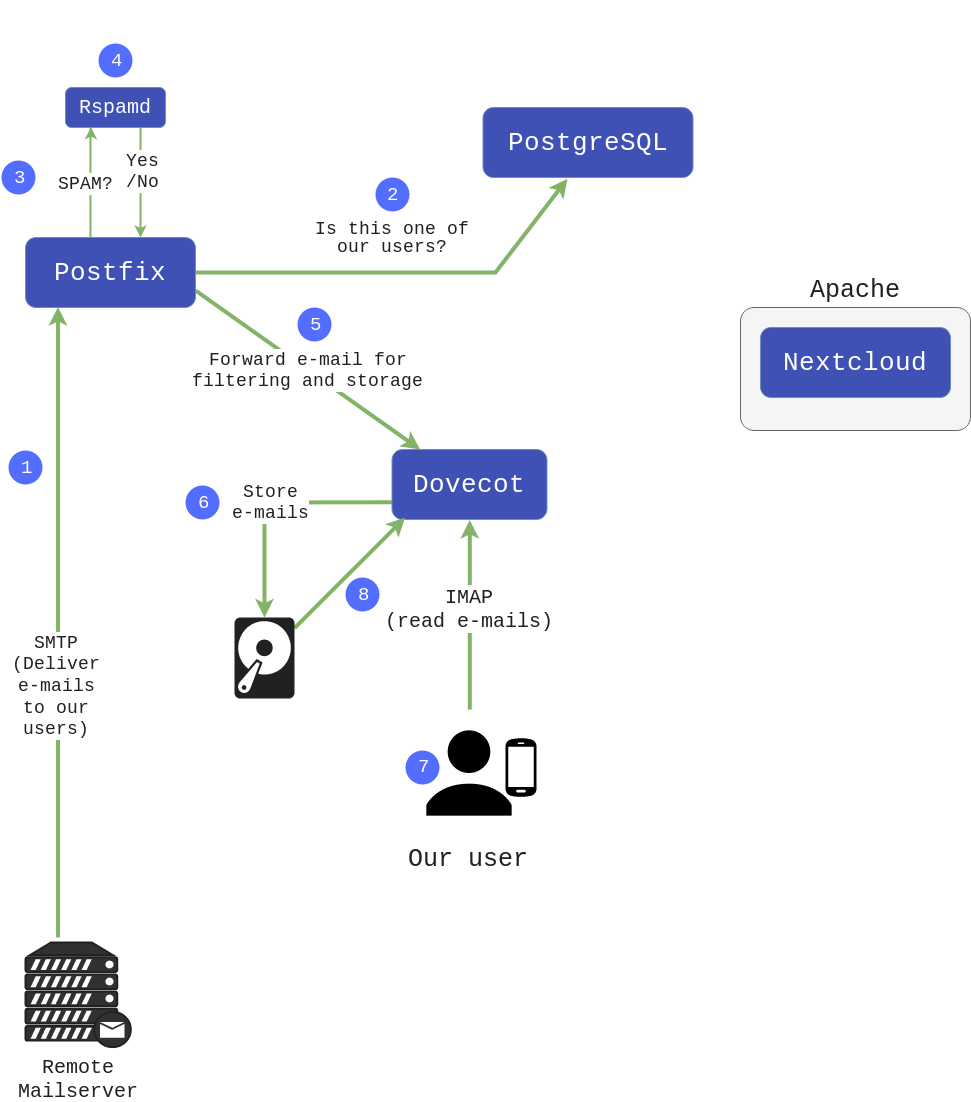
- A remote mail server connects on port 25 where Postfix is listening. They communicate through SMTP.
- Postfix makes some basic checks like verifying that the recipient of the e-mail actually exists on the mail server.
- Postfix forwards the e-mail to Rspamd for further inspection.
- Rspamd inspects the e-mail and
- if Rspamd is sure that its SPAM tells Postfix to reject the e-mail
- if Rspamd does not think its SPAM or is not sure, it adds an additional header and sends the e-mail back to Postfix
- If the e-mail was accepted it is forwarded to Dovecot
- Dovecot stores it in the file system
- A user client connects on port 143 where Dovecot is listening. They communicate through IMAP.
- The client browses mail folders and reads e-mails. Dovecot loads e-mails from the file system on the fly.
As you can see Postfix handles the receiving of e-mails, while Dovecot serves them to the user.
Sending E-Mails in Detail
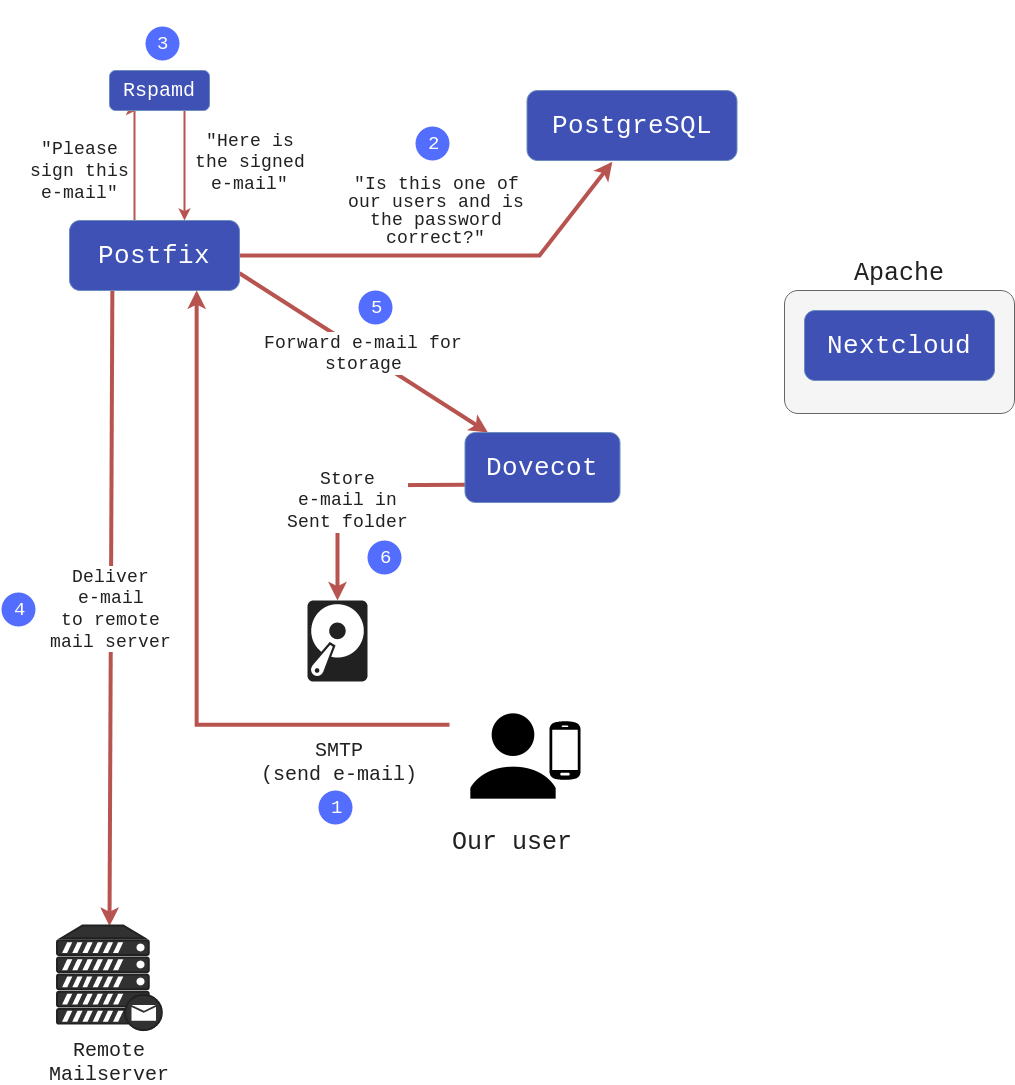
- The user connects on port 25 or port 587 where Postfix is listening. They communicate through SMTP. The client provides a username and password through an encrypted connection.
- Posfix checks whether this username exsits and whether the password is correct.
- Postfix forwards the e-mail to Rspamd which adds a signature (DKIM) to "vouch" that this e-mail is coming from a legitimate mail server.
- Postfix connects to whichever remote mail server on the Internet responsible for the recipients domain.
- Postfix forwards the sent e-mail to Dovecot
- Dovecot stores the sent e-mail in the Sent folder.
Contact/Calendar Sync
- The users phone connects on port 80 where Apache is listening and requests a specific URL.
- Apache lets Nextcloud handle the request.
- Nextcloud communicates with the users phone using CardDAV or CalDAV respectively. The phone sends/receives contacts/calendar events.
Nextcloud/Webmail
- The user uses a browser to connect on port 80 using the URL mail.example.com where Apache is listening.
- Apache lets Nextcloud handle the request.
- Nextcloud shows the login page.
- The user logs in.
- The user navigates Nextcloud and can share files or use the webmail app to read or send e-mails.
- to read e-mails the webmail app connects through localhost to Dovecot and uses IMAP as shown above
- to send e-mails the webmail app connects through localhost to Posfix and uses SMTP as shown above
As you can see the webmail app behaves just like another mail client but connects directly through the loopback interface.
PostgreSQL
The database cluster contains two databases.
-
The first one will be created manually and will contain the mail server logic, i.e. domains that the mail server is responsible for, accounts (=users), mail aliases etc. It is used by Postfix, Dovecot and Nextcloud for their respective purposes. This database will be created manually by us in the tutorial. Later during Nextcloud configuration an app will connect Nextcloud to this first database and enable us to use Nextcloud's user management UI for our custom database. Users for already existing domains then can be added/deleted/modified through Nextcloud's UI without direct access to the database or any additional admin tool.
But some of the settings like the list of domains, aliases or shared folders will need to be changed manually using phpPgAdmin or raw SQL.
-
The second database is used by Nextcloud to store it's own configuration and data. It will be created automatically during the installation of Nextcloud an never edited manually.
Domains, How Do They Work?
It is important to distinguish between the domain of the mail server itself and the domain that the mail server will be responsible for e-mail wise.
Let's say your mail server handles e-mails for the domains example.com, a.com and b.com. Users of these domains will have regular e-mail addresses like alice@a.com, boris.smith@b.com or emil@example.com.
Now let's say the domain name of the mail server is mail.example.com, this is also what will be used in this tutorial. This is the address that your users will have to enter in their e-mail clients (e.g. Thunderbird) as the address of the IMAP und SMTP servers and this is also the URL they will use in their browsers to access Nextcloud1.
The domains a.com and b.com only need a MX record that points to mail.example.com. This will be explained in detail in the DNS configuration of the tutorial.
Also note that because of this all usernames are fully qualified domain addresses, e.g. alice@example.com. You won't be able to simply use the login alice without @example.com because the mail server wouldn't know which domain a user belongs to.
Let's Go!
Congratulations, you read through the "boring" part. Now continue with the actual Tutorial and create your own server!
-
You could create DNS CNAMEs from mail.a.com and mail.b.com to mail.example.com and then setup Apache and Nextlcoud to respond to multiple domains, but this complicates the configuration, e.g. you have to create TLS certificates for each domain and is therefore out of scope for this tutorial. ↩